Automobiles Forum banner
61 - 80 of 492 Posts
Discussion starter · #61 ·
I have been busy working away on the car over the Christmas break and New Year and was hoping to be able to post a load of completed stuff, but as always it never works out like that. There is loads of stuff going on in parallel, getting everything finished off is proving difficult.
As it has been over 2 months since I last updated the page, so I thought I had better put something on (even if is isn't finished yet) to prove that the project is still on-going.

OK first the sump.
As you may remember the ABZ sump is too wide to fit the Lotus chassis requiring a lump to be chopped out of it.
I cut a piece of 15mm thick alloy plate to cover up the hole and that has been welded in place on the lower alloy block section.
Image


I just need to dill and tap a number of M6 hole to hold on the steel pan.
Talking of which, that has to be modified as well.
Here it is before I set about it with the saw, Mmmmmmmmmm nice and straight :)
Image


I cut off the excess part and then used a section off the old bent pan from the wrecked engine to fill the gap.
This new section was then hammered and bent to fit.
Image


The 2 sections were then spot welded together to stop them moving about during MiG welding.
Image


Next the joints were MiG welded, ground to shape and a lick of paint added. Apart from my crappy paint finish it almost looks like the real thing, that will do :)
Image


All that needs to be done is let the paint harden then I can cut a new gasket and bolt it in place.

Next the radiator.
I had an up-rated triple core radiator fitted a couple of years back and that did a real good job of keeping the car cool. However I am now doubling the capacity of the engine so it is probably a good idea to up the size of the radiator as well.
The current radiator only fills 2/3 of the front of the car, the rest being reserved for the air-con radiator. As my car hasn't got air-con the gap was filled with a blanking plate, guess what is going to happen with that blanking plate............
I didn't want to chop up a perfectly good radiator, so after a bit of searching I managed to buy a completely rotten one off eBay. Here you can see it with the old radiator.
Image


I was only interested in the end sections of the knackered radiator as I would have a new core fitted, oh look at that, it has already been done.
Image


3 Spal 11" fans and some mounting brackets later and here is a completed radiator assembly ready to go back on. I just had to test them on the floor to make sure it all worked before crawling under the car.
Image


Finally for this update the drive shafts.

The plan is to use the old Lotus outer CV joints and mount them to Audi inner joints and shafts. I picked up a pair of brand new A4 TDi drive shafts on Flea-bay. Unfortunately when the shafts turned up they didn't fit the gearbox flange, arse!!!!!!
It turns out that the shafts sent are 113mm units and the flanges on the 01X gearbox are 104mm. After a lot of digging about it looks like they changed the size in 2003 to a new size. As the inner joints have less movement they hence wear out more slowly than the outer joints and nobody has got any of the 104mm inner joints, not good.
The only answer is to make up some adapters as getting hold of the correct shafts is proving to be a right pain.

2 chunks of 7075 hi-tensile alloy ready for the lathe and mill treatment.
Image


The mounting holes are printed on paper and then stuck on with spray mount so I can mark the position of the holes.
Image


Machined the drive shaft side of the adapters, just need to finish off the back and then they can be added to the massive pile of parts ready for anodising.
Image


That will do for today, next update, brakes.........................

Hilly
 
nice work... 8)
 
sweet project, i might swim over just to ride in a 4.2 lotus
 
seriously, Awesome fab and machine work!!
 
Discussion starter · #68 ·
This weeks efforts.

Got around to finishing off the drive shaft adapters.
The bolts for the gearbox flange need counterboring to ensure they don't interfere with the back of the CV joint, which meant I had to get a bigger milling cutter.

Image


With the holes counterbored and the back face machined to the required shape it was time to test fit the whole lot onto the gearbox. Phew.... it all fits.
Image


As the new gearbox doesn't have a mechanical speedo drive on it, I need to add some metal to one of the adapters to make a trigger wheel for the new electronic speedo I am fitting. Once that is finished I'll get them anodised.

Now that the paint has had a week to harden on the sump pan I can now fit it back onto the good engine before the dirt and water can get in. Unfortunately as I have hacked a big section off, the sump gasket is not use, so I had to make my own. A handy sheet of synthetic rubber will do nicely for that. Here is the sheet layed out on the now spare alloy sump section ready for the profile to be cut and the bolt holes punched out.
Image


When all done it looks like this....
Image


Now that it is finished I can bolt the modified sump pan to the bottom of the modified engine, ta daa !!!
Image


Just need to make the mounting adapter for the 60-2 trigger wheel and VR sensor and the gearbox can go back on permanently.

Talking of which, I have finally decided to go with VEMS for the ECU so I have been messing around with it on the bench (the VEMS PCB is the blue board in the bottom right hand corner) getting a decent base configuration before trying to start the engine with it.
Image


I have been simulating all the sensor inputs using a PIC microprocessor and then adjusting the configuration files for the ECU until it kinda does what it is supposed to. At the moment it is running the 60-2 crank trigger, coolant sensor, air temp sensor, throttle sensor, air pressure sensor and the idle valve appears to be functioning. Next on the list to simulate is the cam position sensor and then get the knock sensors working, when that is done I can box up the PCB and set about wiring it up.

Hilly
 
All I can say is......

Perfect!

Beautiful workmanship.
 
All I can say is, HOLY CRAP, NICE WORK!!!
this s an awesome project.
My dads bddy is about 3/4 the way done wth the same model Lotus but he is bilding a Mazda rotary with a single big turbo, itll be somthing like 500 CHP, and I believe hes using some sort of porsche transaxle, itll be somewhat scarry when finished.
But the growl of the audi V8 is going to be absoloutly spectacular, cnat wait to see the finshed product!
 
The later 4.2L engines did not come with a gasket. I forget the name of the stuff audi uses but it's a liquid gasketless sealer.
 
Discussion starter · #73 ·
Time for some more news about progress.

Got the manky welded bits of metal back from the powder coaters, all nice and shiny now, mmmmmmmmmmmm...........
Image


So time to start fitting parts to the working engine.
A few people had asked for a picture of the left hand engine/alternator mount so here it is with added tensioner and gear change bracketry goodness..
Image


I bolted on the flywheel/clutch/gearbox a few weeks ago (you can see it fitted on the engine in one of the photos in the last update) and we patted ourselves on the back for another job done. However, when it came time to take off the front crank pulley to fit the 60-2 trigger wheel, we suddenly realised that there was no way to lock the crank to get the big nut un-done.
D'oh!!!! school boy error :(
So off came the gearbox again so we could use the ring gear to stop the crank turning.

With the big bolt un-done and the crank pulley off, time to go about fitting the 7 1/4" trigger wheel.
First job, machine a nice flat surface to mount an adapter plate onto.
Image


With that done, a couple of M5 tapped holes were added.
Image


Then an adapter plate with a spigot for the trigger wheel was machined to be a nice snug fit in the modified pulley and bolted in place with offset screws to make sure it only goes back on one position.
Image


With that done the pulley went back on the engine so I could see how it all fits together and fathom out a bracket for the VR sensor.
Image


The VR bracket now sussed, time to put the gearbox back on.
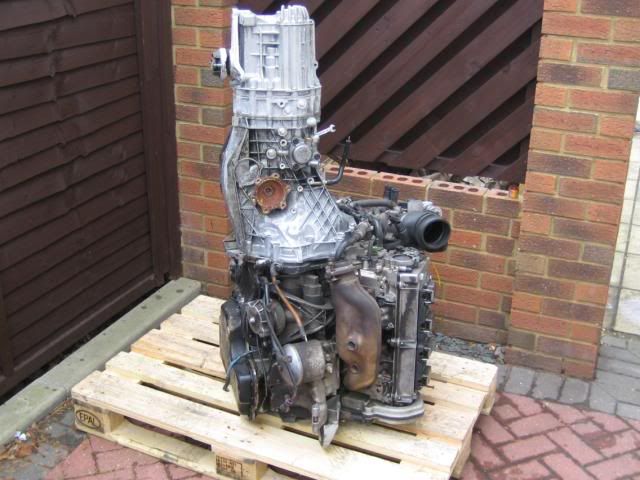
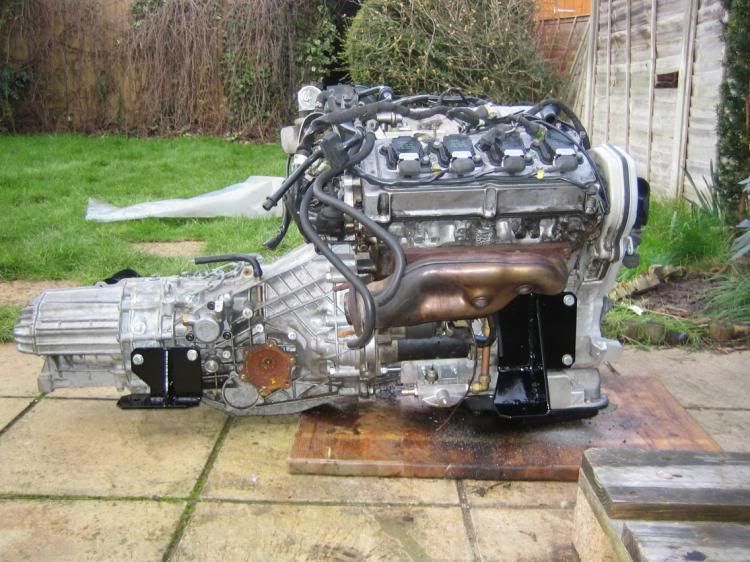
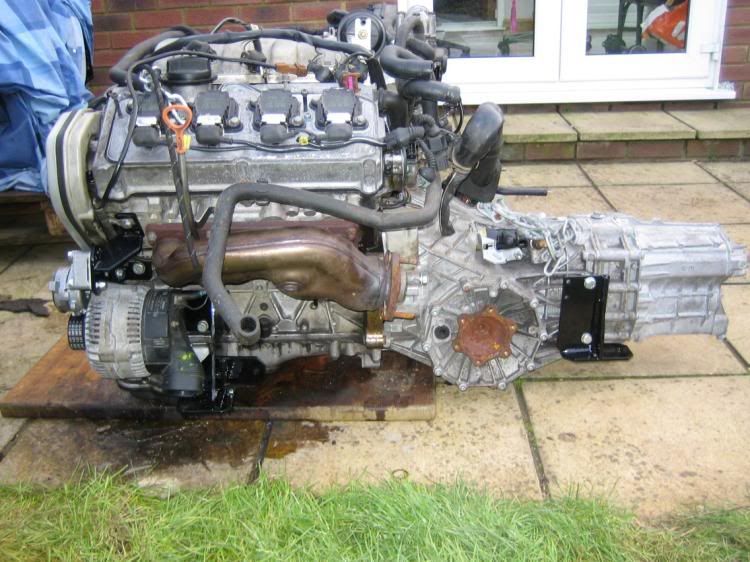
If anyone is interested in getting a feel for the engine/gearbox shape and size, here a a couple of shots of the assembly (spot neighbours wobbly fence!).
Image

Image


I hope that patch of oil comes off my patio ..........................

Also re-fitted the gear change rods back onto the shifter, but not much to take photos there.

Hilly
 
Josh... D-176-404-A2 is the common white sump sealant we use.

Hilly, keep the good work up.
 
please keep the updates coming, I'm loving every one of em :cheers:
 
:woowoo: :woowoo:
 
Discussion starter · #79 ·
This weeks stuff

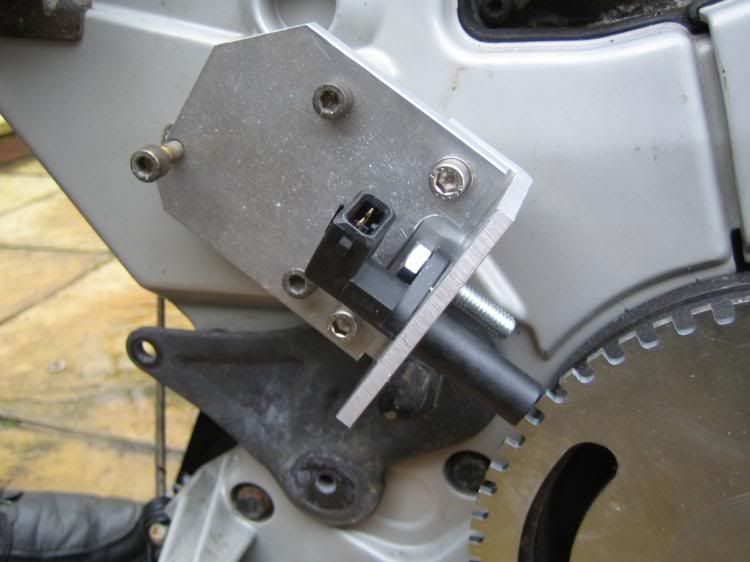
Having got the 60-2 crank trigger wheel fitted to the pulley I can now position the VR sensor. As I won't be using the fan on the front of the engine, I took off the bearing and used the mounting point to secure the VR sensor bracket to the cam belt cover.

Image


I know the bracket looks a bit overkill, but it needs to stay put, it is also adjustable to allow me to fine tune the gap between the sensor and the trigger wheel. All I need to do now is get the final few issues with the VEMS ECU sorted and I can then set about splicing it to the Audi loom.

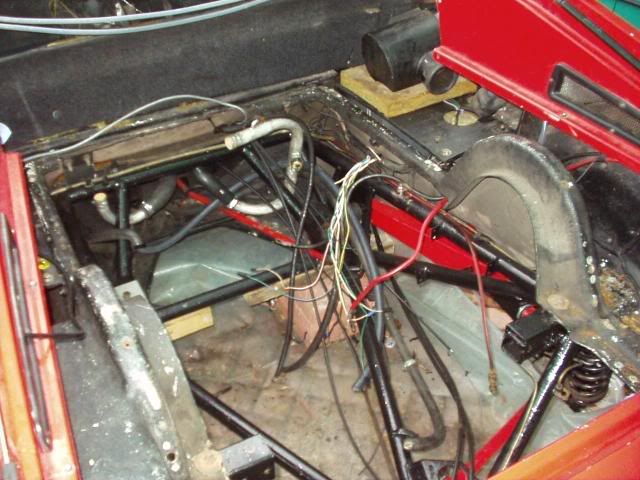
Next job is to re-fit the engine/gearbox into the car so I can measure the required drive shaft lengths so they can be sent off to be modified. As this update is a bit light, here are a few gratuitous big engine in little car shots to pad things out a bit.
Image


Phew!!!! It fits in the engine covers...................
Image


Here you can see the position of the gearbox at the back of the car.
Image


Now that the gearbox is in it's final position I can now modify the rear cross brace to clear the casing.
Image


Having measured the amount to cut off, set about the cross brace with the grinders. Unfortunately my little grinder decided to curl it's toes up when I got 90% through finishing off, so I am a bit stuck till I go to the shop and buy another one.
It also started to pee down , and not having a garage to keep the wet stuff off meant that rain stopped play.

Hopefully if things work out how I want this week I should be able post a bumper update next week, hmmmmmmmmmm, probably jinxed it now...............

Hilly
 
61 - 80 of 492 Posts